Pages

Saturday 30 December 2017

Stampin' Up! Christmas Treat Boxes

Jillian Selwood, Purple Jelly Designs, Independent Stampin’ Up! Demonstrator

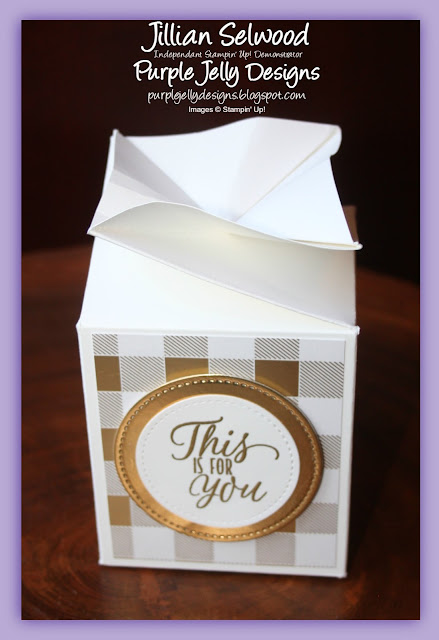
I love making little gifts to give to people at Christmas to say thank you. Our dogs go to Doggy Day care on a Wednesday so I always make a little something for the staff who look after Harley and Molly so well.  This year I made these stunning boxes and filled them with chocolate.  I used an old retired Stampin' Up! Christmas DSP.

Twist and close box for sweeties

I cased these boxes from Samantha Clayton at Mixed up Crafts, to find her tutorial click here. They are very easy to make but look like they have taken you hours!

Year of Cheers Speciality Design Series Paper, Twist and close box


These are the same boxes but in a larger size. For these I used the stunning Year of Cheers Speciality Designer Series Paper.

Year of Cheers Speciality Design Series Paper, Twist and close box

I will certainly be making these again.

Year of Cheers Speciality Design Series Paper, Twist and close box


Thank you for stopping by this week and reading my blog, I do hope you’ve enjoyed it. Until next week.


Jillian xx
Friday 29 December 2017

Stampin' Up! Picture Perfect Birthday Card

Jillian Selwood, Purple Jelly Designs, Independent Stampin’ Up! Demonstrator


Welcome to the Crafty Cupcakes Team Stampin' Up! Blog Hop for December 2017. Each month members of the Team take part in our Team Blog Hop to share with you our cards and projects made using the fabulous Stampin' Up! products. You are currently visiting Jillian Selwood from the UK and below you will see the full list of everyone taking part. To move to the next blog just click the name after mine in the list. This month our theme is a Sneak peek at the brand new Stampin' Up! Spring / Summer catalogue which goes live on 3rd January.

Simple Stripes Textured Impressions Embossing Folder, Bermuda Bay, Lemon Lime Twist, Peekaboo Peach, Berry Burst

I decided to use the Picture Perfect Birthday stamp set which I was lucky enough to receive at the Stampin' Up! OnStage event in November. It's a fabulous stamp set and can be used for many different occasions, not just birthdays. I've actually cased this card from the new catalogue.

Picture Perfect Party DSP, Glitter Enamel Dots, Picture Perfect Birthday stamp set

I started off with a base of Bermuda Bay, a layer of Lemon Lime Twist which I dry embossed with the Simple Stripes Textured Impressions Embossing Folder. The DSP is one of the stunning designs from the Picture Perfect Party DSP. I also used the Berry Burst 3-8" Metallic Edge Ribbon under the Peekaboo Peach sentiment layer. I finished the card off with some Glitter enamel dots.


Picture Perfect Party Birthday Card, Bermuda Bay, Lemon Lime Twist, Peekaboo  Peach, Berry Burst


The Team have worked really hard on our Blog Hop to bring you a variety of creativeness and inspiration. Make sure you click the next name on the list to carry on through the Hop.


Thank you once again for visiting my blog and taking part in our blog hop, there are so many amazing ideas and inspiration you don't want to miss so make sure you carry on hopping through the list. Remember that currently you are at my blog Jillian Selwood so check the blog hop line up list to see who is next.

Until next week
Jillian xx

Friday 22 December 2017

Stampin Up! Merry Mice Special Christmas cards

Jillian Selwood, Purple Jelly Designs, Independent Stampin’ Up! Demonstrator

This year I decided to make all my Christmas cards using the same stamp set, the retired Merry Mice Stamp Set.

For my husband I made a wiper card, in purple, of course!

Merry Mice Wiper Christmas Card

The front looks quite normal but when you pull on the sides this happens

Merry Mice Wiper Christmas Card

How cool is that? To find out how you can make one visit Samantha Clayton of Mixed Up Crafts here

Here's a close up of the wiper bit

Merry Mice Wiper Christmas Card

I also made this Z Fold card for my Mother in Law and my Dad and his partner Kate.

Merry Mice Z Fold Christmas Card

This will be my last blog post before Christmas so I hope you all have a fabulous day and that Santa brings you some lovely presents.

Thank you for stopping by this week and reading my blog, I do hope you’ve enjoyed it. Until next week.


Jillian xx

Sunday 17 December 2017

Stampin' Up! Botanical Blooms Card in a Box

Jillian Selwood, Purple Jelly Designs, Independent Stampin’ Up! Demonstrator


Welcome to the December Pootles Birthday Club Blog hop. It was my Aunties 80th Birthday at the beginning of December so that means I can take part in this hop. Stupidly though I forgot to take a photo of the card I made for her so here is a similar card I made for a friend who celebrated her 40th birthday earlier this year.


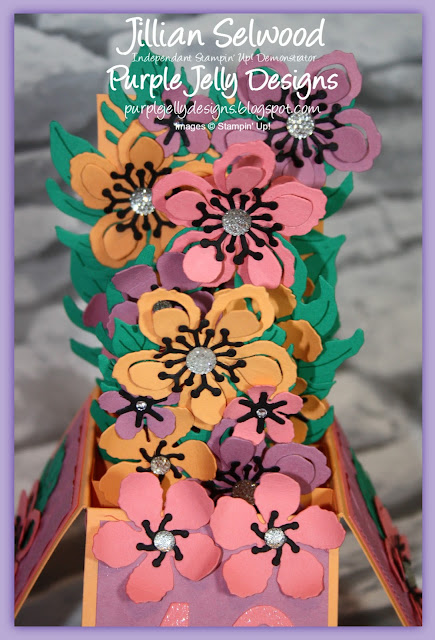
Botanical Blooms Card in a Box, Special Birthday Card


I absolutely love making these Card in a box cards. They are a real labour of love as they take around 8 hours to make from start to finish but they are so stunning that it's worth the effort.

Peekaboo Peach, Sweet Sugarplum, Emerald Envy, Flirty Flamingo

For my Aunts card I used slightly different colours, So Saffron, Peekaboo Peach and Blushing Bride with Pear Pizzazz for the leaves, so just a little more subtle than this card. 

I think the Botanical Blooms bundle is absolutely perfect for these cards as the flowers are all different sizes but look fabulous together. Unfortunately the set has now retired but I will be keeping hold of mine.

Here's close up of the flowers, don't the faceted gems look stunning as the flower centres?

Card in a Box, Silver Faceted gems, 40th birthday card

Don't forget to keep hopping, just click on the links below to see the other beautiful creations my fellow Pootlers have made.


Thank you for stopping by this week and reading my blog, I do hope you’ve enjoyed it. Until next week.


Jillian xx

Friday 15 December 2017

Stampin' Up! Merry Mice Christmas cards

Jillian Selwood, Purple Jelly Designs, Independent Stampin’ Up! Demonstrator

This year I made three different Christmas cards using the Retired Merry Mice Stamp set. I love this set, it's sooo cute.

Merry Mice Stamp Set, Merry Christmouse, Christmas Card

I left off the Dazzling Diamonds glitter for the first card as I know not everyone likes glitter, to be honest I'm not a big fan myself as it goes everywhere and I do mean everywhere!

Merry Mice Stamp Set, Merry Christmouse, Christmas Card

Unfortunately you can't see the Dazzling Diamonds of either of these cards but trust me it is there.

Merry Mice Stamp Set, Merry Christmouse, Christmas Card

Aren't they cute and I love the sentiment, Merry Christmouse, awww

Thank you for stopping by this week and reading my blog, I do hope you’ve enjoyed it. Until next week.


Jillian xx
Friday 8 December 2017

Stampin' Up! Lift me Up Fancy fold Card

Jillian Selwood, Purple Jelly Designs, Independent Stampin’ Up! Demonstrator

The Theme for the Great Card Swap challenge in September was Up, Up and away.

;Lift me up Stamp set, Up and Away Thinlit dies, Fancy fold card

I love the Lift me up Stamp set and the Up and away Thinlet dies, so this was a perfect excuse to use them. I also used the now retired DSP which co-ordinates perfectly with the stamps and dies.

Sending smiles across the miles, Hot air Balloon fancy fold card

My swap partner this month was in Germany so the sentiment 'Sending Smiles across the miles' seemed very appropriate.

Hot air balloon, Lift me Up Stamp Set, Up and Away thinlit dies, Fancy fold card

Thank you for stopping by this week and reading my blog, I do hope you’ve enjoyed it. Until next week.


Jillian xx

Friday 1 December 2017

Stampin' Up! Sunshine Wishes Wedding Card

Jillian Selwood, Purple Jelly Designs, Independent Stampin’ Up! Demonstrator

Here is another Personalised wedding card I made recently. The brief was to make a card in earthy tones with a splash of blue and purple.

Sunshine Wishes Thinlits, Perfect Plum, Marina Mist, Wedding card

I used a base of Crumb Card with Marina Mist and Perfect Plum as my splashes of colour. I didn't want to put the personalised text on the front of the card as I though it would detract from the simplicity of the card so I decided to make an Easel card. I love making easel cards but do think they need have instructions on how they stand up!

Personalised Easel Wedding Card in earthly colours with a splash of Blue and Purple

The personalised text was printed on a piece of Crumb Cake cardstock and mounted on Gold Foil.

Sunshine Wishes Thinlits, Sunshine Sayings Stamp Set, Wedding Card

I really love how this turned out. It would also make a lovely Anniversary card.

Thank you for stopping by this week and reading my blog, I do hope you’ve enjoyed it. Until next week.


Jillian xx

Friday 24 November 2017

Stampin' Up! Coffee Break Random Act of Kindness Card

Jillian Selwood, Purple Jelly Designs, Independent Stampin’ Up! Demonstrator

For my September Random Act of Kindness card I used the Coffee Break Designers Series Paper.

Old Olive, Early Espresso, Coffee Break DSP, You've got style Stamp Set

I started off with a card base of Early Espresso which I thought was rather appropriate! On the top I used a layer of Old Olive which I dry embossed with the Petal Burst Textured Impressions Embossing Folder. I cut a strip of the Coffee Break DSP and adhered that off to the left hand side. The sentiment 'you can't improve on Fabulous!' is from the You've got Style Stamp Set.

Coffee Break DSP, Random Act of Kindness Card, Petal Burst Embossing Folder

To finish it off I tied some retired Whisper White and Early Espresso Bakers Twine around the Old Olive card before adhering it to the card base.

Thank you for stopping by this week and reading my blog, I do hope you’ve enjoyed it. Until next week.


Jillian xx

Friday 17 November 2017

Stampin' Up! This Little Piggy OnStage Swaps

Jillian Selwood, Purple Jelly Designs, Independent Stampin’ Up! Demonstrator

In Colour 17-19 Swaps for OnStage Nov 17, She believed she could....so she did

This time last week I was in Birmingham at the Stampin' Up! OnStage convention. This is a twice yearly event. It's great to meet up with all my crafting friends, and create with them.

OnStage Nov 2017 Swaps, This Little Piggy Stamp Set

This Little Piggy Stamp Set, Playful Backgrounds, OnStage Swaps

 It is a tradition of Stampin' Up! that at all their events you make swaps which you hand out to other crafters and they give you one of their swaps. It's a fabulous way to get lots of inspiration as everyone seems to see different things in the stamp sets and dies.

Berry Burst, Fresh Fig, Lemon Lime Twist, Powder Pink, Tranquil Tide

These are the cards I made. I used the five new In Colours for 2017-2019. Berry Burst, Fresh Fig, Lemon Lime Twist, Powder Pink and Tranquil Tide. I also used the This Little Piggy Stamp set and the Playful Backgrounds stamp set.

OnStage 2017 Swaps using 17-19 In Colours

Thank you for stopping by this week and reading my blog, I do hope you’ve enjoyed it. Until next week.


Jillian xx

Thursday 16 November 2017

Stampin' Up! Bundle of Love DSP Thank You Cards


Jillian Selwood, Purple Jelly Designs, Independent Stampin’ Up! Demonstrator


Welcome to the Crafty Cupcakes Team Stampin' Up! Blog Hop for November 2017. Each m

onth members of the Team take part in our Team Blog Hop to share with you our cards and projects made using the fabulous Stampin' Up! products. You are currently visiting Jillian Selwood from the UK and below you will see the full list of everyone taking part. To move to the next blog just click the name after mine in the list. 

Thank You Cards using Stampin' Up! products

The theme for this month is Thankful. Whilst we don’t celebrate thanksgiving here in the UK I do love to send Thank you cards - any excuse to make and send a card! There is always something or someone to be thankful for so it’s just nice to be able to recognise it.

For these Thank you cards I used the Bundle of Love Speciality Designer Series Paper, this beautiful paper is double sided, on one side it’s either Blushing Bride or Soft Sky and on the other side it’s cream and gold.


Blushing Bride Thank You Card, Painted Harvest Stamp Set

Soft Sky Thank You Card, Bundle of Love DSP


So I started the cards with a base of Very Vanilla thick cardstock and used a mat of either Soft Sky or Blushing Bride. Then I embossed the sentiment on the bottom - ‘I am thankful for you’ this comes from the Painted Harvest Stamp Set. Then I cut some small strips from the DSP and adhered them above the sentiment. I then punch out three circles using the new Starburst Punch in all three Designs. These were adhered to the front of the card using two of the coloured side and one of the gold side.

Thank You card, Starburst Punch, Bundle of Love DSP

Finally, I die cut the smaller flower from the Flourish Thinlet dies and adhered this on top of the two strips of DSP at the bottom of the card before adding a gold Faceted gem to the centre. I was rather pleased with how these turned out and I really hope the recipients like them too.

Thank You Card, Flourish Thinlit Dies, Gold Faceted Gems

Thank you once again for visiting my blog and taking part in our blog hop, there are so many amazing ideas and inspiration you don't want to miss so make sure you carry on hopping through the list. Remember that currently you are at my blog Jillian Selwood so check the blog hop line up list to see who is next.


Until next week
Jillian xx

Friday 10 November 2017

Stampin' Up! Black White and Gold Wedding Card

Jillian Selwood, Purple Jelly Designs, Independent Stampin’ Up! Demonstrator

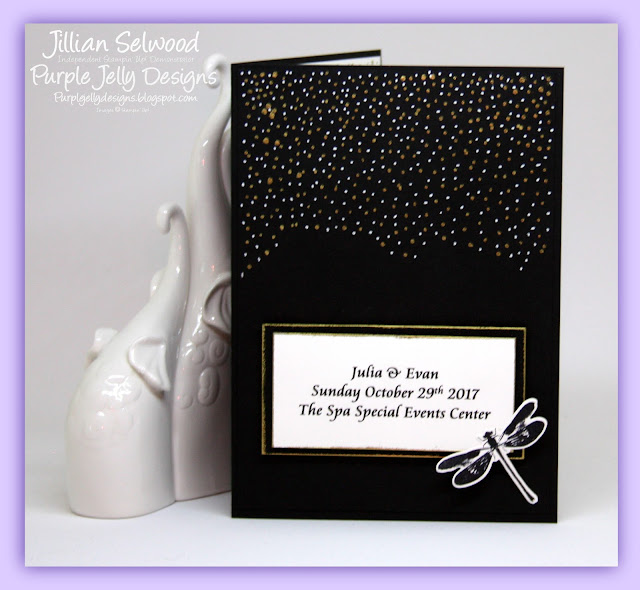
I was asked to make a Personalised Wedding card recently and my client asked if I could make a card to match the wedding invitation.  The card on the left in the photograph below is the invitation and the card on the right is the card I made.

Black, White and Gold Wedding invitation and matching personalised card

I did have a bit of a panic as I didn't have a dragonfly stamp but fortunately my very good and kind friend Lea sent me her Awesomely Artistic stamp set to use. Thanks so much Lea x

Gold heat embossing, Gold Foil, Special Wedding Card

I heat embossed the gold spots on the card and then used my white gel pen for the white spots.

Gold Foil, White Gel Pen, Personalised Wedding Card

For the inside of the card I used Gold embossing powder and then my Basic Black Stampin' Write Marker pen for the black dots. I used the sentiment 'wishing you both a very special day' from the retired For the New Two stamp set.

Dragonfly, Awesomely Artistic, For the New Two Stamp Set

I also stamped the dragonfly on the back of the envelope but unfortunately I forgot to take a photograph of that. I was really pleased with how the card turned out and my client loved it as well.

Thank you for stopping by this week and reading my blog, I do hope you’ve enjoyed it. Until next week.


Jillian xx

Friday 3 November 2017

Stampin' Up! Climbing Orchids Cards

Jillian Selwood, Purple Jelly Designs, Independent Stampin’ Up! Demonstrator

Earlier this year I entered the Simply Sketched Saturday Challenge with this card, to see the original post click here

Lemon Lime Twist, Melon Mambo, Peekaboo Peach, Climbing Orchid Stamp set

I loved the card so much I decided to make it again but I wanted the orchids to stand out more.

To do this I stamped the flowers on a scrap of Whisper White and die cut the three parts before adhering together. I then curled the petals before adhering to the square.

Climbing Orchid Stamp Set, Orchid Builder Framelits, Peekaboo Peach

I used the same Layered Leaves 3D Dynamic Textured Impressions Embossing Folder as I thought that worked perfectly.

Flirty Flamingo, Climbing Orchids Card

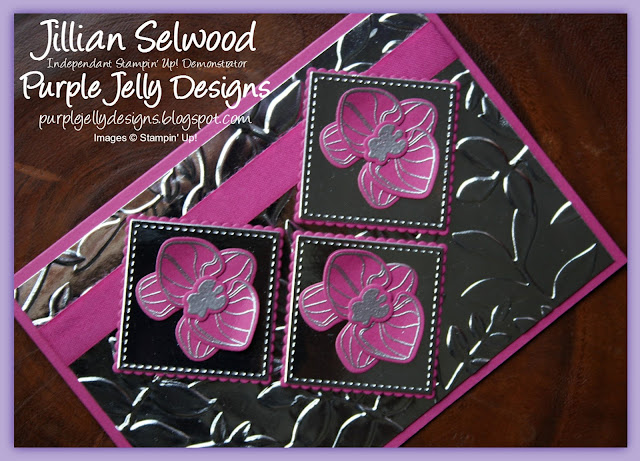
Then I tried to heat embossed the orchids and wondered what it would look like if I dry embossed a sheet of silver foil. I was rather pleased with the result although my husband thought it was too much.

Climbing Orchids, Layered Leaves Dynamic Textures Impressions Embossing Folder

A crafting friend of mine recently promoted to Silver so I thought this card was perfect to send her as a congratulations card.

Climbing Orchid, Silver Foil, Fresh Fig

So which is your favourite, please leave me a comment below.

Thank you for stopping by this week and reading my blog, I do hope you’ve enjoyed it. Until next week.


Jillian xx

Friday 27 October 2017

Stampin' Up! Cookie Cutter Christmas New Baby Card

Jillian Selwood, Purple Jelly Designs, Independent Stampin’ Up! Demonstrator

I have recently made two New Baby cards for a client of mine. They were both personalised with the name of the baby, date of birth and weight and height. I used the Cookie Cutter Christmas Stamp set and matching punch, I just love being able to use a Christmas stamp set all the year round.

Cookie Cutter Christmas New Baby Card

I also used the Falling Petals Embossing folder as I think it looks like hearts falling down the page rather than leaves. I stamped the envelope on the flap with a Teddy Bear and sponged the edges of the envelope too.

Decorated envelope, New Baby card, Powder Pink

This is the inside of the card.

New Baby Card, Cookie Cutter Christmas Stamp Set

Do you need a personalised card or something a little bit more special than shop bought cards, if you do then drop me an email.

Thank you for stopping by this week and reading my blog, I do hope you’ve enjoyed it. Until next week.

Jillian xx
09 10