Pages

Tuesday, 29 August 2017

Stampin' Up! Colorful Seasons Easel Card

Jillian Selwood, Purple Jelly Designs, Independent Stampin’ Up! Demonstrator

I'm so disappointed that it's the final week of August as that means it is also my final week on the Crafty Cupcakes Design Team, I've thoroughly enjoyed myself and would like to thank Lea for the opportunity.  I am on the Design Team with Emma Hudson of Little Crafty Me, you can visit Emma's blog here. We have been given the Colourful Seasons Stamp Set to work with. It also comes with the Seasonal Layers Thinlits Dies and you can save 10% if you buy the bundle. 


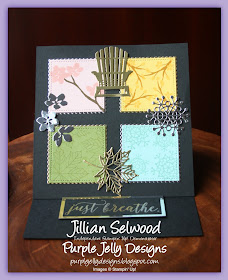
This week was a difficult one, as there are only four seasons and I've already done Spring, Summer, Autumn and Winter what on earth was I going to do for this week? So I decided to take part of each of the four cards I have already made and put them onto an Easel card.

Colourful Season Stamp Set, Easel card, All 4 seasons in one card

I die cut cardstock in Powder Pink, Daffodil Delight, Old Olive and Pool Party using the Stitched Shaped Framelit dies then die cut a scalloped square in Gold foil for the Summer and Autumn colours and Silver foil for the Spring and Winter colours.

Powder Pink, Daffodil Delight, Old Olive, Pool Party, Gold Foil, Silver Foil

I also die cut the flowers, chair, leaf and snowflake in Gold and Silver foil.

Then I had to decide which sentiment to choose and not only that what colour to stamp it in. So I decided on 'Just breathe' as that is my favourite and I used both gold and silver Heat Embossing powder, I was quite pleased how it turned out.

Just breathe, Gold and Silver embossing powder

I think I might trying that again. I also layered the sentiment on Gold and Silver foil which is cut on an angle.

Here is the card in all it's glory. I'm not sure I would have chosen all these colours together but I actually think it works. What do you think?

Easel Card, Four seasons card, Just breathe


Don't forget to hop over to see Emma's beautiful creation here.

Thank you for stopping by this week and reading my blog, I do hope you’ve enjoyed it. Until next week.


Jillian xx

Saturday, 26 August 2017

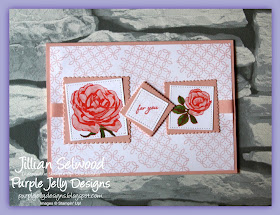
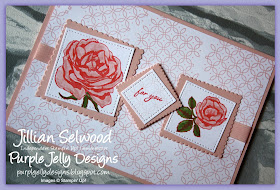
Stampin' Up! Graceful Garden card

Jillian Selwood, Purple Jelly Designs, Independent Stampin’ Up! Demonstrator
  

Thank you for joining us for another Simply Sketched Saturday Challenge! We’re so excited to be sharing this hop with you.  The products used are all available in the current Annual, or seasonal, Stampin’ Up!® Catalogues*. Simply use the buttons at the bottom of the post to keep hopping!

This month I was my turn to design the sketch and this is what I came up with - I do like clean and simple cards and you can't get more clean and simple than this!


I started off with a Card base of Powder Pink and stamped a layer of Whisper White with the background stamp from Graceful Garden. I cut three squares with the Stitched Shapes framelits dies of differing sizes and scalloped  squares from Powder Pink cardstock. 

Graceful Garden stamp set, Powder Pink, For you, card

I used the large rose from the Graceful Garden stamp set for the largest square, the smaller rose for the medium sized square and then the sentiment 'for you' for the smallest square.

Stitched Shaped Framelits, Layering Squares Framelits

I then decided to add some ribbon, the 1/2" Finely woven ribbon in Powder pink worked perfectly. When I lined all the squares up I didn't really like how it looked so I adhered the white stitched squares at an angle. I also adhered the smallest square at an angle as well. 

Powder Pink cardstock, Powder Pink 1/2" Finely woven ribbon


I'm really pleased with how this has turned out and can't wait to see what everyone else has come up with.

Thanks for stopping by today, I do hope you like this weeks card.

Don't forget to use the buttons below to continue hopping. Pressing next will take you to the lovely Christine and pressing previous will take you to the equally lovely Sally.


Until next week

Jillian xx

Tuesday, 22 August 2017

Stampin' Up! Colorful Seasons Christmas Card

Jillian Selwood, Purple Jelly Designs, Independent Stampin’ Up! Demonstrator

It's already week 4 of the Crafty Cupcakes Design Team for this month. I am on the Design Team with Emma Hudson of Little Crafty Me, you can visit Emma's blog here. We have been given the Colourful Seasons Stamp Set to work with. It also comes with the Seasonal Layers Thinlits Dies and you can save 10% if you buy the bundle. 


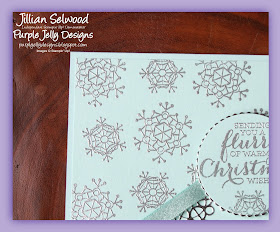
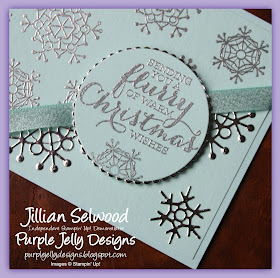
This week I have used the beautiful snowflakes for my card. Whilst I don't really like snow I love snowflakes on cards!

Pool Party 3/8" Shimmer Ribbon, Pool Party cardstock, Silver Embossing powder

I used a card base and top layer of Pool Party, I'm not really sure if this is a pale blue or a pale green colour, I just know I love it.

Colourful Season Stamp Set, Silver Heat Embossing, Snowflakes, Christmas cardI tried, and failed miserably, to stamp the snowflakes randomly didn't I? Oh well I still think they look nice.  I heat embossed in Silver the snowflakes on the top of the card and die cut the snowflakes with silver foil at the bottom of the card.

I used the sentiment from the Flurry of Wishes Photopolymer Stamp Set as I thought that was very appropriate, 'Sending you a flurry of warm Christmas Wishes'. I also used some of the new beautiful Pool Party 3/8" Shimmer Ribbon, I think it works perfectly with the silver embossing and the silver foil.

Seasonal Layers Thinlit Dies, Christmas Card, Flurry of Wishes stamp set


Don't forget to hop over to see Emma's beautiful creation here.

Thank you for stopping by this week and reading my blog, I do hope you’ve enjoyed it. Until next week.


Jillian xx

Friday, 18 August 2017

Stampin' Up! Disney themed Minnie Mouse Card

Jillian Selwood, Purple Jelly Designs, Independent Stampin’ Up! Demonstrator

The Theme for the Great Card Swap group for July was Disney / Pixar. I'm afraid I took the easy route this month and made a Minnie Mouse card.

Real Red, Basic Black, Wood Words Stamp Set, Brights DSP Stack

It's still very cute though, well I think so!

Minnie Mouse, Swirly Scribbles Thinlit Dies, Bow Builder punch


I used the Swirly Scribbles Thinlet Dies for the head and ears. The red spotty DSP is from the now retired Brights Designer Series Paper Stack. I made the bow using the bow builder punch. The sentiment and stars are both from the Wood Words Stamp set.

This is the card I received from the very talented Sally Shaw of SallyStampers, you can visit Sally's blog here.


Thank you for stopping by this week and reading my blog, I do hope you’ve enjoyed it. Until next week.


Jillian xx

Thursday, 17 August 2017

Stampin' Up! Autumn / Winter Sneak Peak Cat punch

Jillian Selwood, Purple Jelly Designs, Independent Stampin’ Up! Demonstrator


Welcome to the Crafty Cupcakes Team Stampin' Up! Blog Hop for August 2017. Each month members of the Team take part in our Team Blog Hop to share with you our cards and projects made using the fabulous Stampin' Up! products. You are currently visiting Jillian Selwood from the UK and below you will see the full list of everyone taking part. To move to the next blog just click the name after mine in the list. This month our theme is a sneaky peak from the new Autumn/Winter catalogue that goes live on 1st September 2017. 

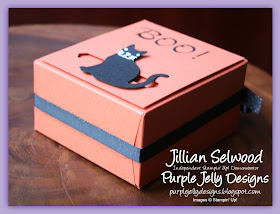
Halloween Treat Box, Stampin' Up! Autumn Winter Catalogue 2017

Halloween seems to get more popular every year over here. We usually get between 80 and 100 trick or treaters on the night knocking on our door! Well it's a good excuse to buy lots of sweets and chocolates isn't it. I always make something special for our neighbours children and this year will be no exception

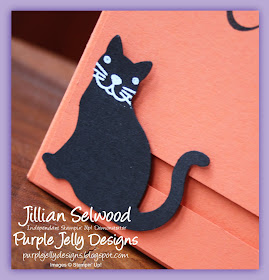
As soon as I saw the cat punch in the new catalogue I wanted it. Although we have two dogs I do class myself as a cat person. I wanted the cat to take centre stage on the box so I used the classic label punch to make a long groove in the card layer. I punched two 3/4" circles and attached them either side of the groove with a Stampin' Dimensional, then I glued the punched out cat to the top circle. This means the cat can move from one side of box to the other.

I stamped BOO! near the top of the layer using the Brushworks Alphabet Stamp set.

I made the box using the Gift Bag Punchboard, I just love how neat the flaps are, makes the box look professionally made.

Cat punch, Pumpkin pie, Basic Black 3/8" Shimmer ribbon

I stamped the 'face' on the cat using the stamp from Foxy Friends stamp set, I think it looks a little too big but still much better than if I attempted to draw a face myself!

Cat punch, Foxy Friends, Classic Label punch

I wrapped some the of new beautiful basic black 3/8" shimmer ribbon round the box and tied a dubious bow on the top.

Basic Black 3/8" Shimmer Ribbon, Brushwork Alphabet stamp set

So all I need to do now is make three more boxes and buy some sweets to fill them up. I think I will leave the sweets until nearer the time otherwise I'll eat them all.

Thank you once again for visiting my blog and taking part in our blog hop, there are so many amazing ideas and inspiration you don't want to miss so make sure you carry on hopping through the list. Remember that currently you are at my blog Jillian Selwood so check the blog hop line up list to see who is next.


Until next week.

Jillian xx

Tuesday, 15 August 2017

Stampin' Up! Colorful Season Autumn Card

Jillian Selwood, Purple Jelly Designs, Independent Stampin’ Up! Demonstrator

It is week 3 of the Crafty Cupcakes Design Team for this month. I am on the Design Team with Emma Hudson of Little Crafty Me, you can visit Emma's blog here. We have been given the Colourful Seasons Stamp Set to work with. It also comes with the Seasonal Layers Thinlits Dies and you can save 10% if you buy the bundle. 


This week I have decided to use the leaves and produce an Autumn card, this would be perfect for a Thanksgiving card as well, although we don't celebrate Thanksgiving in this Country.


I started off with a card base and top layer of Old Olive. I stamped the layer with the outline leaf stamp with Old Olive ink and also sponged the edges. Then I stamped the outline leaf onto Old Olive, Cajun Craze and Daffodil Delight cardstock and die cut using the Seasonal Layers Thinlit Dies. Again I sponged the edges of the leaves to give a more autumnal look to them. I die cut the outline leaf in Gold Foil and adhered that to the Old Olive leaf.


I decided to use the sentiment 'May all your tomorrows be as happy as today' which I stamped onto Old Olive cardstock and layered with some gold foil. This would make a fabulous sentiment for a Wedding Card, wouldn't it?


I'm rather pleased how this card has turned out, what do you think?

Don't forget to hop over to see Emma's beautiful creation here.

Thank you for stopping by this week and reading my blog, I do hope you’ve enjoyed it. Until next week.


Jillian xx

Sunday, 13 August 2017

Stampin' Up! Masculine Cards

Jillian Selwood, Purple Jelly Designs, Independent Stampin’ Up! Demonstrator


It was my birthday on the 2nd August so that means I get to join in with the Pootlers' Team Birthday Blog Hop - Yay!

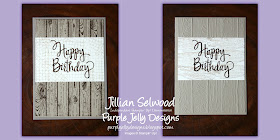
I always struggle with ideas for Masculine cards so thought I would share two Masculine Birthday cards I have made recently.

Masculine Cards using Stampin' Up! products

Although the theme is the same they are two completely different cards. The one on the left is stamped using the Hardwood Stamp and the one on the right is dry embossed using the Pinewood Planks Dynamic Textured Impressions Embossing Folder (or DTIEF for short!) 

I also used the brilliant Stylised Birthday stamp set. I stamped the background with the Timeless Textures Stamp set.

Hardwood Stamp Set, Timeless Texture stamp Set, Masculine card

Pinewood Planks DTIEF, Stylized Birthday stamp set, Crumb cake

I don't really have a favourite as they are both so different, I really like them both equally. Which one do you prefer?

Don't forget to visit the other blogs to see more stunning creations, just use the buttons below:


Thank you for stopping by this week and reading my blog, I do hope you’ve enjoyed it. Until next week.


Jillian xx

Tuesday, 8 August 2017

Stampin' Up! Colorful Seasons Sunset Card

Jillian Selwood, Purple Jelly Designs, Independent Stampin’ Up! Demonstrator

It is week 2 of the Crafty Cupcakes Design Team for this month. I am on the Design Team with Emma Hudson of Little Crafty Me, you can visit Emma's blog here. We have been given the Colourful Seasons Stamp Set to work with. It also comes with the Seasonal Layers Thinlits Dies and you can save 10% if you buy the bundle. 


This week I have stepped right outside my comfort zone with this card.

Colourful Season Stamp Set, Daffodil Delight

I never seem to get the shading just right whenever I attempt to blend colours together, so I've been practising and am rather pleased with this. I used shimmery white cardstock and the Stampin' Up! sponge daubers and it seemed to blend much easier.

Sunset, Daffodil Delight, Tangerine Tango, Real Red, Dapper Denim


I die cut the chair from a piece of Wood Textures DSP Stack, I love this paper but just wish it was 12" x 12" instead of 6" x 6".

This sentiment is my favourite from this set, I just love it.

Just breathe, Colourful Season Stamp Set, Seasonal Layers Thinlit Dies, Wood Textures DSP Stack

It just seemed the perfect stamp set to use with the chair and the sunset.

Don't forget to hop over to see Emma's beautiful creation here.

Thank you for stopping by this week and reading my blog, I do hope you’ve enjoyed it. Until next week.


Jillian xx

Friday, 4 August 2017

Stampin' Up! Daisy Delight card

Jillian Selwood, Purple Jelly Designs, Independent Stampin’ Up! Demonstrator

I love receiving handmade cards so jumped at the chance to join Fiona Whitehead and her group called Pootlers RAK. RAK standing for Random Act of Kindness. The idea is that you send a handmade card to as many people in the group as you like.

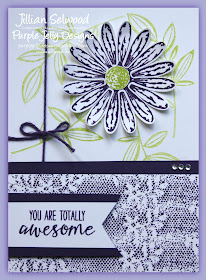
In July I sent out three cards and this is the design I chose.


Daisy Delight, Random Act of Kindness

The lovely Sacha Van de Kerkhof of Stampin' Sacha, designed this card as a Make and Take months ago and I've been meaning to make it again using new Stampin' Up! products. 

Elegant Eggplant meats Lemon Lime Twist, Daisy Delight

The Daisy worked perfectly. 

Since the New In Colours came out earlier this year I have wanted to use Elegant Eggplant and Lemon Lime Twist together as I thought they would look stunning. I'm really pleased with how it looks, what do you think?

You are Totally Awesome, Grateful Bunch stamp set, Falling Flowers Stamp set, Touches of Texture stamp set

I used the sadly retired stamp set called Grateful Bunch and the sentiment 'You are totally Awesome' only because all the ladies in the group really are totally awesome.

I was lucky enough to receive two beautiful Cards.

The first from Sarah Crankshaw, 


And the second from Deb Steele.


Thanks so much Sarah and Deb I love them both very much.

Thank you for stopping by this week and reading my blog, I do hope you’ve enjoyed it. Until next week.


Jillian xx

Tuesday, 1 August 2017

Crafty Cupcakes Design Team August 2017 Week 1

Jillian Selwood, Purple Jelly Designs, Independent Stampin’ Up! Demonstrator

I am delighted to have been invited to take part in the Crafty Cupcakes Design Team for the month of August along with Emma Hudson of Little Crafty Me, you can visit Emma's blog here. We have been given the Colourful Seasons Stamp Set to work with. It also comes with the Seasonal Layers Thinlits Dies and you can save 10% if you buy the bundle. 


For week one I have made a 3D project using the beautiful Window Box Thinlet Dies. I fell in love with this box immediately I saw it last year at OnStage. 

Window Box Thinlet Dies, Seasonal Layers Framelits Thinlits Dies


I made the box using Powder Pink cardstock and distressed the edges with Blushing Bride ink. I then stamped three different flowers in Blushing Bride ink on Powder Pink cardstock before die cutting. I also die cut the branches out of Soft Suede cardstock. I cut a smaller hexagon for the top which I stamped with the sentiment 'Life is a beautiful thing'.

Life is a beautiful thing, 3D project, Crafty Cupcakes Design Team

I decided to adhere the branch directly onto the box sides but adhered the flowers and top with Stampin' Dimensions to give some height. I finished off with medium pearls in the centre of the die cut flowers and large pearls on the top and a generous brush with my Wink of Stella pen on all the flowers.

Colourful Season Stamp Set, Powder Pink, Blushing Bride, Soft Suede


I'm really pleased with how it's turned out and I think it would make a perfect Wedding favour box filled with chocolates. I hope you like it too.

Don't forget to hop over to see Emma's beautiful creation here.

Thank you for stopping by this week and reading my blog, I do hope you’ve enjoyed it. Until next week.


Jillian xx